When creating your visual media, you want to save as much as possible while getting a product worthy of your company. The more you do in-house, the less you’ll pay professional studios to finish them. Here’s a basic and easy to follow roadmap to produce commercial quality videos by using off-the-shelf consumer equipment to make it happen. You’ll discover both traditional and unorthodox ways to save big bucks at each step of the process.
The savings you’ll experience by using this video production strategy compared to hiring an established studio is huge. Master the videography process, and you can save up to 80 percent by doing it yourself.

Project Planning & Story Boarding – Before a video is shot, it needs to be planned. A story board breaks your video production into logical and sequential scenes. Without such a framework you’ll spend more time planning and likely lose control of the story-line structure. You must clearly define what you want the video to achieve. Will it be for sales and marketing, customer support or even employee training? Most videos have an introduction and ending. Between this will be one or more scenes. Within each scene you can have dialog, still or video images, graphics, Special-Effects, a Spokesperson or Voice over Specialist, music, sound effects and time length of the scene. Little wonder most videographers use Story Boards before ever shooting a single frame of a project.
The concept of using a Story-Board is simple. Once the theme or object of the video is determined, you should write the dialog of each scene. This helps defines the length of the video and serves as a roadmap to add the components of each scene. We’ll provide you Story-Board templates in both landscape and portrait configuration.
Download the storyboard template for your video planning.
Studios – Above all else, you need a place to tape your videos. Secure a physical location large enough to set up lighting and with enough area for the type of videos you want to produce. Also, you need to consider the power available to the studio and equipment you plan to use. A studio using incandescent lights will draw more energy than LED’s or fluorescent lights. If you use a teleprompter, make sure there is enough space between the “talent” being taped and the teleprompter so text can be read without excessive eye-movement. Have the teleprompter too close, and it looks like the talent might be insincere by constantly shifting the eyes to read. A studio should also be air-conditioned and “cooled down” before a shoot. This is especially critical if the compressor or fan is next to the studio. You do not want the air-conditioning to kick in the middle of a scene.
A studio stage should have acceptable acoustics. It would not be a good idea to have a video tapping environment next to a machine shop or assembly line unless you intentionally wanted the background noise of a busy workshop in every video. If no other alternative exist, you can soundproof the room and employee unidirectional microphones to greatly reduce or eliminate the ambient outside sound. An empty room with barren walls will cause environmental reverberations and echoes when recording your video. Carpeting the floor and placing items in the room helps break up sound resonance. Professional studios use acoustic panels placed on the walls to absorb ambient background noise. If you’re looking for a cheaper alternative, try googling “convoluted foam bed topper”. You’ll find non-traditional substitutes for acoustic paneling for considerably less. For example, an “economical” professional 96″x48″ acoustic foam panel runs $54.99 plus shipping (From $15 to $20). You can get a 77″ x 56″ queen size foam bed topper at Walmart for $16.94. As amateurish as it sounds, some shoestring studios even employee egg cartons glued on the wall to reduce cost. If you decide to use any kind of acoustic foam barriers, please don’t smoke or get incandescent lights near them. You want your videos hot, not the studio!
Every video requires a background, so choose it for the effect you want to achieve. If you’re looking to produce a video library for training, customer support or knowledge transfer, you should consider using a consistent background and company logo. Consistency is subconsciously linked to stability and is instantly recognized by web followers that some knowledge of value is about to be given.
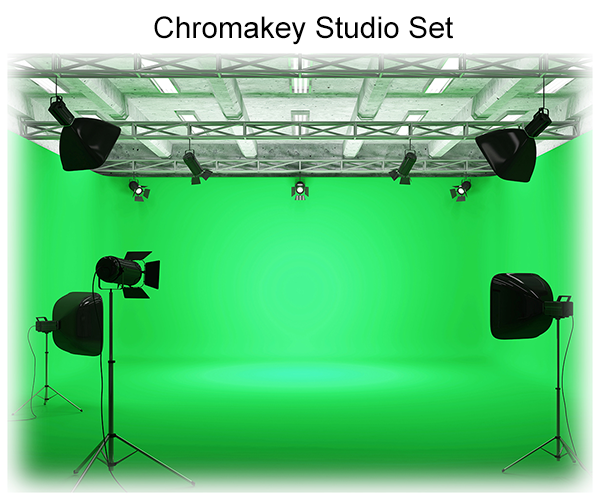
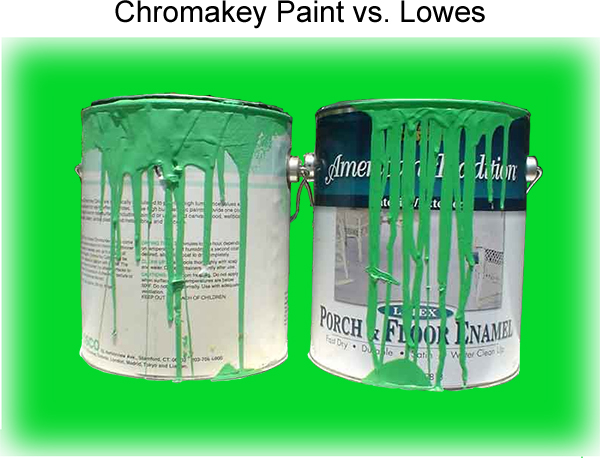
Professional studios have a need to create an array of backgrounds for whatever project they take on. This is why you’ll see video sets painted green. During Post-Production you can strip the green away (technically turning it into an alpha channel) and insert any background you choose. If your video strategy calls for a large number of different background scenes you might want to consider a chromakey (or green-screen) strategy. You can either use a green muslin cloth or paint the entire background green. If you decide to “green” a studio, the cost of traditional chromakey paint is expensive. You can save over half price by going to Lowes and purchase a paint mixture with the following numbers: 103-4Y 113-1Y 1145Y32 Base 4. The photo proved by detonationfilms.com shows little difference the expensive Chromakey paint (on the right) and the Lowes mixture. This chromakey option allows for incredible flexibility, but may not be right for all. Employing Chromakeying requires additional Post-Production work which increases cost. If you have the occasional need for a chroma background you can always use a green muslin cloth hung on the wall or placed on a background stand.
Mobile support stands with muslins could be your best choice if you require only one or two standard backgrounds. This strategy allows you can take your equipment to different locations for taping while still maintaining a consistent look. This equipment can be quickly assembled or broken down for transfer or storage. Muslins are cloth backdrops hung from an eight to twelve foot wide stand. They come in a variety of colors and images, the most popular being green, white and black. You can get muslins with patterns or images to add visual contrast. If you decide to go with a muslin, be sure to steam or iron it if it has pronounced wrinkles. For those with an SLR type camera and know how to set it to wide aperture (low f-stop) you can blur out the background giving a nice soft backdrop.
Studio Check List:
- Determine if you require a green-screen video set or a standard background image.
- Be sure your studio is physically large enough to accommodate your video production strategy.
- Studio should be separated from high-noise work areas to reduce background acoustics.
- Pay attention to acoustic nature of studio and sound-proof if required.
- Make sure enough power is available for lights and other videography equipment.
Digital Video Cameras – As a business or blogger, you don’t need to purchase professional equipment to get professional looking products. Your objective is to make high-quality videos to positively influence your goals. Selecting the HD 1080p format is a good option. It’s considered a high quality web standard. There are higher resolution options such as 4K which are not as universally accepted by web video sites as HD 1080p. Also, it generally cost more time and money to edit in 4K. If you need to purchase a video camera, go to local camera stores, Walmart or established mail-order houses like B&H Photo or Adorama. Once you select the type of model you want, you can google reviews to fine tune your search. Virtually any major camera manufacturer produces hardware which will give you an excellence visual product. You can purchase a nice consumer camera for a fraction of the cost compared to a mid-level pro camera and still get a high quality visual media product. If you’re looking at the lowest possible video production cost then you should consider a point and shoot model. For those who need a wide range of marketing goals including both still image and video capture, the additional cost of a single lens reflex camera will be less important. If you need to record in environmentally challenging areas, a ruggedized unit might be the only option. Avoid using the camera’s internal microphone if possible.
Note: We exclude discussing cell phone cameras in our analysis since they generally lack the ability to attach to tripods and other video stabilization systems seriously limits their use in videography.
Video Camera Check List:
- Determine the visual media products you need to produce to meet your sales and marketing goals.
- Decide on the resolution you want your camera to record.
- Select features you want your video recorder to have which will meet your videography goals while fitting within your budgeting constraints.
- Determine if your camera will be used in your audio recording strategy. (Click “Using Digital Video Cameras” link above for more information.)
- If you have a teleprompter or want to eventually acquire one consider a camera which will interface with it.
- Inspect the environment in which you will be videotaping to determine how rugged your camera needs to be.
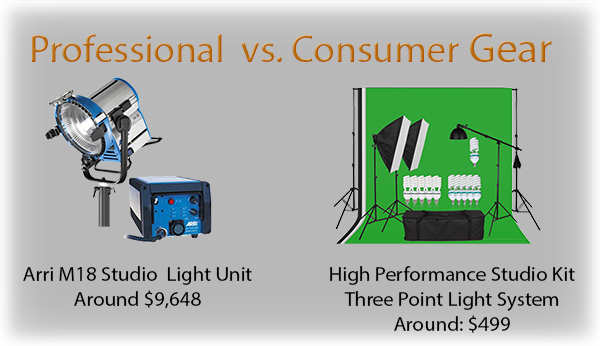
Video Lighting – It’s said that visual media artist uses the background as canvas and light as paint. Lucky for you that your brushes are lots cheaper than the ones used by studios. Most businesses and bloggers have little need to achieve cinematography mood setting. For the vast majority engaged in web videography, using a low cost video lights will meet all the requirements to produce quality visual media. The three types of lighting best suited for creating web videos are Incandescent, Florescent and LED Lights (light-emitting diodes). We avoid discussing professional level HMI & Plasma Lights since the benefits for business and blog based web videos do not justify the huge price differential. You can literally own a well-equipped visual media studio for significantly lower cost than a single professional HMI model light unit like the Arri M18.
There are two main lighting configurations used by both commercial and web oriented videographers. They are Three-Point and Overhead Lighting. Both configurations are superior to straight on lighting as they produce a more natural looking image in addition to a three dimensional effect caused by the angle of the light casting shadows.
3-Point Lighting
This simple lighting strategy is all that’s needed for commentary and customer education videos. This setup creates such good results that even the most renowned studios use it. 3-Point Lighting technique is used to better define the video spokesperson. Shadows produced by 3-Point Lighting help the brain create the illusion of dimensionally. Using a single front facing light produces an annoying background shadow and a very flat looking face.
3-Point lighting consists of a main (key) light, placed at an angle, to illuminate the subject’s face, a fill light to wash out shadows produced by the key light and a backlight, which shines on the subject’s head to better define it from the background.
The distance between the backlight and the back of the video talent’s head should be based upon the intensity of halo it produces. Obviously, you should make sure the backlight is not in the frame of the video recording.
There is no set equation to give you the best results when using 3-Point Lighting. The power settings of the Key and Fill Lights, along with the off-set angle and distance used will depend on the facial features of your spokesperson and effect you like best. Using the Back Light as a starting point, The Fill Light should produce from two to three times the illumination. The Key Light should be six to eight times the power when compared to the Back Light. If x is the amount of illumination the back light produces, we have:
Key Light = 6 to 8x
Fill Light = 2 to 3x
Back Light = 1x
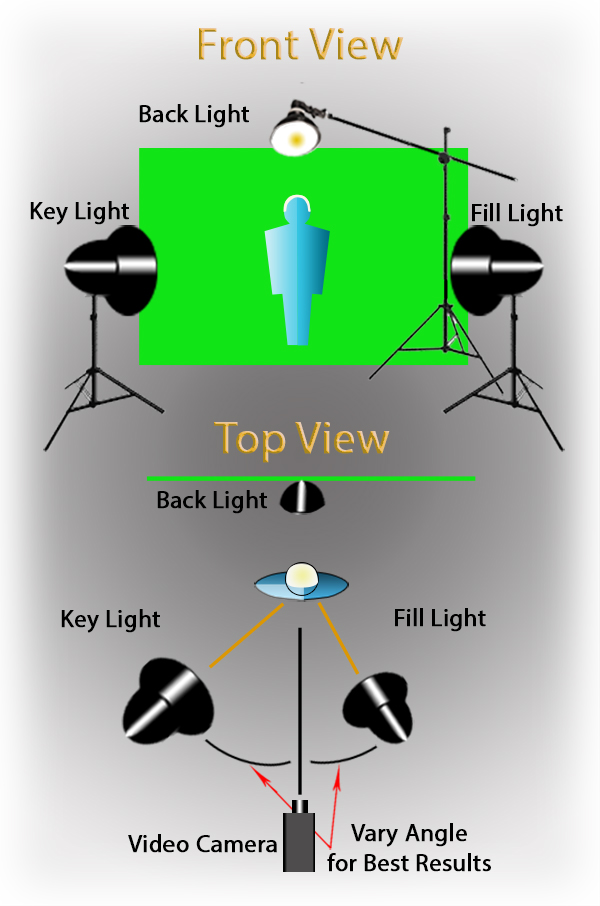
The above ratios provides is a rough explanation on how to get the best lighting results. If you do not have lighting sources that generate the above ratios, you can move each light source closer or further from the subject to get the result you want. As with most thing video, you should experiment to fine tune and get the kind of results you are seeking.
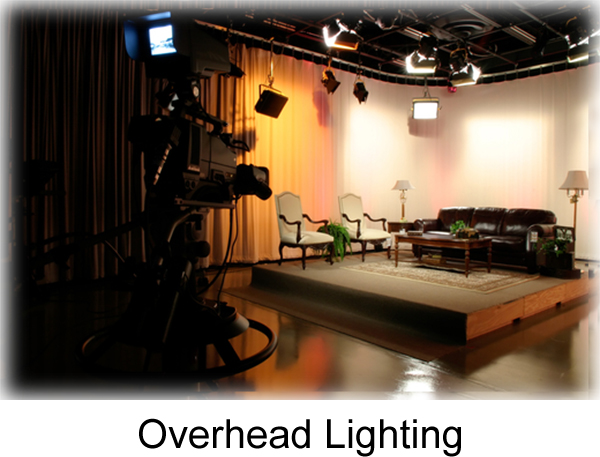
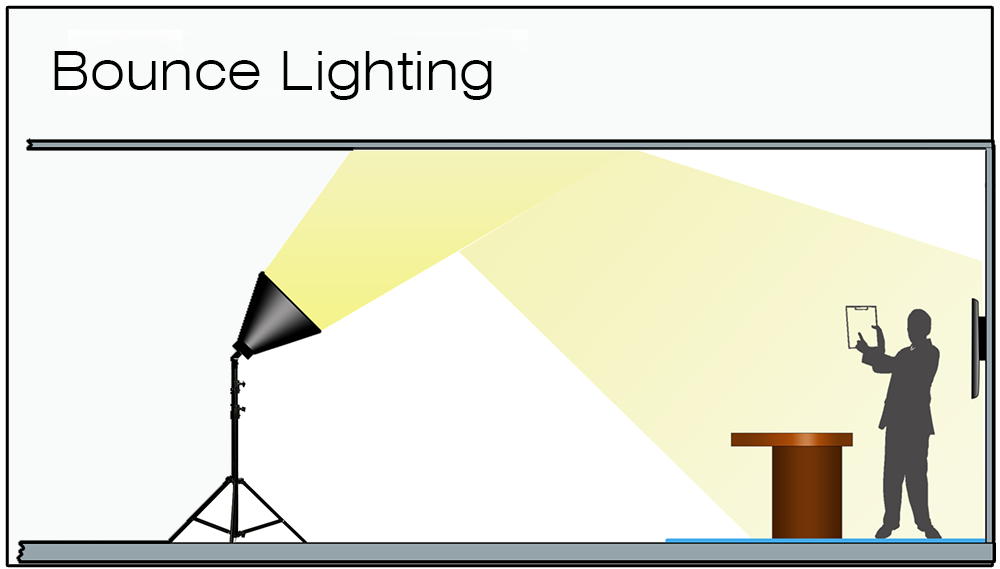
Overhead Lighting – Movement is dynamic and helps to keep your audience focused. If your video strategy requires your subject to be mobile on the set, you need a lighting solution that illuminates a wider area than 3-Point Lighting. Many professional studios hang arrays of ceiling lights to create a more dynamic studio environment. This design allows multiple people on set and movement around products for sales, training or illustrating concepts. Hanging an array of lights at an angle above and pointed down at the studio set is the best way to achieve a wider lit area. You can either hang lights from the ceiling or use a free standing truss system. Ceiling lighting is a more costly setup than a 3-Point Lighting System, but provides a wider range of videography options. Keep in mind that the larger the area being taped, the more lights you will need to use.
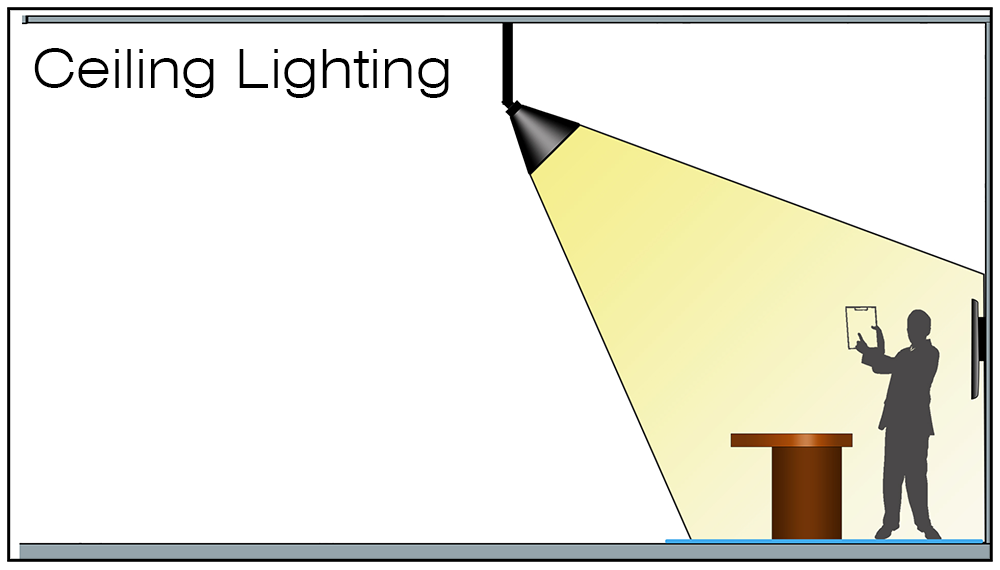
Your physical location usually determines the kind of overhead lighting you can use. If you have a high enough ceiling you can attach lights above the studio area using an anchoring system. For those with lower ceilings, a bounce lighting configuration is appropriate.
Video Lighting Check List:
- Decide the type of presentation best suited for your visual media strategy. Will a three point lighting system meet your goals, or will you need overhead lighting for a larger stage.
- Will you videotape exclusively from a single studio or need lightweight and sturdy illumination units for transport to multiple locations?
- Determine if you want dramatic lighting effects which power hungry Incandescent lights will provide or use an energy efficient softer light which is the standard for most web videographers?
- Will your studio lights remain in place or will you constantly be setting up and storing the lights?
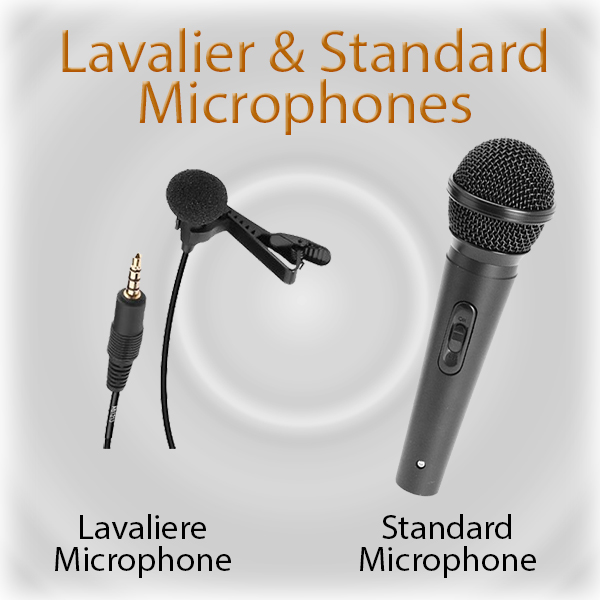
Audio Capture – Quality audio is a must for any professional level videos. Unfortunately, consumer cameras are not known for their great microphones. Also, background noise will rise as the distance between talent and the camera increases. You’ve seen this on countless YouTube videos where the audio is weak, tinny or muddy. This is why we discourage the use of your camera’s built in microphone. If your camera has an audio input you can employee a wireless lavalier or traditional wired Microphone directly to your talent.
Most studios use unidirectional microphones. These mics are designed to be more sound-sensitive towards the front and less so on the sides and rear. In this way background noise is lessened while it magnifies the words of the person it’s pointed at. Microphones come in two main physical configurations. One is the larger type which is usually hand held or attached to a desk stand or mic boom. They are often just out of camera view pointed towards the spokesperson. The other is a lavaliere microphone. These are small mics, usually placed on a shirt collar or jacket lapel of the video talent. They are either wired to a recorder or wireless which offers total mobility on set. The lavaliere mic has become a mainstay for most testimonial videos where stage mobility is a must.
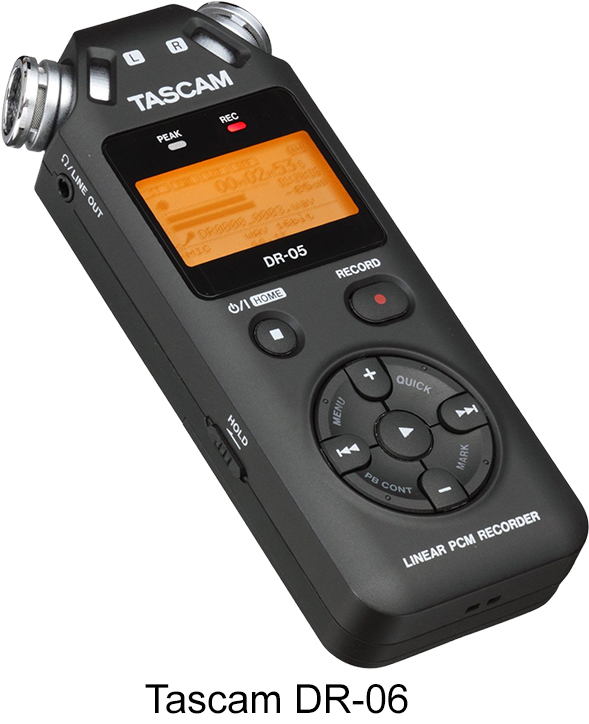
When a unidirectional microphone is close to the mouth of the person being taped, their voice will generate decibel levels much higher than the background noise of a typical video set. This offers a one-step audio capture opportunity. There will be very little, if any, background noise to address in post-production. If your video recorder has an audio input jack and you use it with an external microphone, the resulting audio will likely be good enough to use without further editing. You can also use a low cost and mobile digital recording platform like the Tascam DR-05. These recording devices offer a lot of flexibility. They can be mounted on a desktop microphone stand for voice over work, be used with studio boom stands and, when attached to a lavaliere microphone, can also serve as a mobile on-set audio recorder. These little stereo units combine microphones with a digital recording base. They’ll give you a high quality audio product which is typically saved to removable micro SD memory cards. If you’re looking to produce videos with two or more people on-set you might want to acquire a multi-track recorder. These types of units are more expensive and usually require a higher level of expertise. When using an external audio recorder, you must synchronize the audio to the video and merge them in post-production. Just like the pro’s do, using the time honored clapper board is the best way to synchronize a video. If you’re shooting multiple scenes, just use an erasable marker on the clapper board and call out the scene title just before you clap the bar. Virtually any video editing software will easily allow you to merge video to sound tracks. Last, make sure your microphone has the same jack size as your recording device.
Before you start videotaping, you should fine-tune your audio recorder by using earphone to “monitor” the acoustic environment. Have your video talent say a few lines to make sure you have the right volume level. You are looking for that optimum recording zone where you “balance” the voice by increasing the microphone’s sensitivity to eliminate background noise without getting to the point where you hear static feedback. The human ear tends to ignore environmental noise which is all too clear on a recording. This is why earphones are a must. You’ll hear the exact acoustic profile your recording device will copy.
Digital Audio Recorder Check List:
- Decide if you will use your camera or an external digital audio recorder.
- Avoid using the camera’s on-board microphone if possible.
- Have the microphone pointed at and near the head of the video spokesperson.
- Use a lavaliere microphone when the video talent is required to move around the set.
- Be sure your digital recording unit has both a microphone and earphone jack.
- To get the best audio product use earphones to test and calibrate your recording device.
- When employing an external digital recorder use a clapper board to synchronize up the audio to the video in post-production.